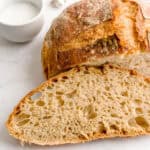
Rustic Italian Bread (No Knead!)
This easy rustic Italian bread has a crispy golden crust, chewy crumb and deeply developed flavor - all without any intensive kneading. Using simple ingredients and a stretch and fold method, you'll create an artisan-style loaf right in your kitchen.
Servings: 10 slices
Calories: 155kcal
Equipment
- Dough whisk or spatula
- Banneton (oval or round, depending on your Dutch oven) or towel-lined bowl
- Silicone sling (oval or round, depending on your Dutch oven) or parchment paper
- Bread lame or very sharp knife
Ingredients
- 250 grams bread flour
- 100 grams all-purpose flour
- 80 grams whole wheat flour
- 4 grams instant yeast
- 8 grams kosher salt
- 345 grams water room temperature
Instructions
- Mix the dough. In a large bowl, combine all flours, yeast, salt and water. Stir with a dough whisk, spatula or stand mixer (with dough hook attachment) just until no dry bits remain. Cover the bowl with a towel or lid and let it rest at room temperature for an hour.
- Stretch and fold. After the dough rests for an hour, perform your first set of stretch and folds: - Wet your hand to prevent sticking.- Grab one side of the dough, gently stretch it upward, and fold it over itself.Rotate the bowl 90° and repeat 3 more times for a total of 4 folds.- Cover and repeat this process every 60-75 minutes, 4 to 5 times total (sample timing: start around 5 PM and finish just before you get ready for bed).
- Shape and cold ferment overnight. Lightly flour a banneton or medium bowl lined with a clean towel. Shape the dough into a ball by gently folding the edges under to create surface tension. Place it seam-side up into the floured banneton. Optional: Lightly dust the seam side with flour so it doesn't stick once covered. Cover with a tea towel and refrigerate for 10-12 hours.
- Proof at room temperature. Take the dough out of the fridge and let it rest at room temperature for 1.5-2 hours.
- Preheat the oven with Dutch oven inside. With about 1 hour of proofing left, place your Dutch oven (with lid on) into a cold oven. Preheat to 475°F (246°C) for 30-40 minutes.
- Flip, brush and score. Flip the dough out onto a sheet of parchment or silicone sling. Optional: Brush lightly with water and sprinkle with seeds (sesame, poppy, etc.). Score the top with a sharp knife or bread lame - I recommend a cross-shape for circular loaves or one long vertical slash for oval loaves.
- Covered bake. Carefully place the dough (on parchment or silicone) into the preheated Dutch oven. Cover with the lid and bake at 450°F (232°C) for 25 minutes.
- Uncovered bake. Remove the lid and bake for another 10-20 minutes until golden brown and crispy to your liking.
- Cool completely. Remove the bread and let it cool on a wire rack for at least 1 hour (ideally until completely cool!) before slicing to avoid a gummy interior.
Notes
Tips and Tricks
- Don’t skip the stretch-and-folds! They build gluten gently and create a light, chewy texture - without intensive kneading.
- Wet your hands. Right before every stretch and fold, make sure your hands are wet as this prevents the dough from sticking to you and helps you with the folds.
- Don't skip pre-heating the Dutch oven. This will help create the optimal condition for your loaf to rise in the oven.
Storing, Freezing and Reheating
- Storing. Store the loaf right in the Dutch oven at room temperature for about 2-3 days.
- Freezing. Freeze the bread slices in a freezer-safe bag. Make sure the slices don't touch - I like to make a few layers of bread slices, separating them with parchment paper to make sure they don't stick to each other.
- Reheating. Once you're ready to eat, toast or air fry slices at 350°F straight from the freezer (or Dutch oven) until they're toasted to your liking.
Nutrition
Serving: 1 slice | Calories: 155kcal | Carbohydrates: 32g | Protein: 5g | Fat: 1g | Saturated Fat: 0.1g | Polyunsaturated Fat: 0.3g | Monounsaturated Fat: 0.1g | Sodium: 313mg | Potassium: 69mg | Fiber: 2g | Sugar: 0.1g | Vitamin A: 1IU | Vitamin C: 0.001mg | Calcium: 9mg | Iron: 1mg
Tried this recipe?Mention @AFabulousBite or tag #AFabulousBite!
