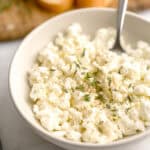
Homemade Ricotta Cheese
Creamy, fresh and surprisingly easy, this homemade ricotta cheese is a game-changer in the kitchen. Whether you're spreading it on toast, folding it into pasta or using it in desserts, this DIY version adds a light, fluffy texture and rich dairy flavor that store-bought just can’t match.
Servings: 4 servings
Calories: 150kcal
Ingredients
- 4 cups whole milk
- ⅓ cup white vinegar
- 1 teaspoon kosher salt or granulated sugar (if using this ricotta in a sweet recipe)
Instructions
- Heat the milk. Add milk and salt into a saucepan and heat over medium until it begins to simmer - don't let it boil!
- Add the acid. Once simmering, slowly add in the vinegar. You’ll begin to see the milk curdle as curds separate from the watery liquid, also known as whey.
- Form the ricotta. As a skin forms on the surface, gently push it toward the center of the pot without stirring. Continue pushing the whey while the mixture sits at a low simmer for 3-4 minutes until curds have fully formed.
- Strain the curds. Line a fine-mesh strainer with cheesecloth and place it over a bowl. Gently spoon the curds into the strainer, allowing the whey to drain.
- Choose your texture. For creamy ricotta, drain for 5-10 minutes. For firmer ricotta, drain for up to 30 minutes.
- Enjoy or store. Enjoy right away or transfer to an airtight container and refrigerate. Use within 3-5 days for the best flavor and texture.
Notes
Storing and Freezing
- Storing. Keep ricotta in the fridge in an airtight container and use within 3-5 days of making it.
- Freezing. It's best to not freeze ricotta as the texture will not be the same once thawed.
- Use a thermometer. If you’re unsure if your milk is warm enough, milk should be around 190°F when you add the acid.
- Don’t skip the salt (or sugar for sweet versions). It enhances the flavor.
- Let it cool. You’ll want the ricotta to come to room temperature (at least!) before using it in cold dishes like dips or desserts.
Nutrition
Serving: 1 serving | Calories: 150kcal | Carbohydrates: 11g | Protein: 8g | Fat: 8g | Saturated Fat: 5g | Polyunsaturated Fat: 0.3g | Monounsaturated Fat: 2g | Cholesterol: 29mg | Sodium: 675mg | Potassium: 367mg | Sugar: 12g | Vitamin A: 395IU | Calcium: 302mg | Iron: 0.01mg
Tried this recipe?Mention @AFabulousBite or tag #AFabulousBite!
